My First Laser Engraved Slate Coasters | Free Laser Cut Projects by LaserFileFinder
- LaserFileFinder
- Mar 17, 2024
- 3 min read
Updated: Jun 29, 2024
How to create your first slate coasters with your laser engraver.
Laser Engraving Slate Coasters
In this blog we're going to list out all the materials used to create these slate coasters, so whether you're missing an item on a list or looking to compare against what you already have, we've included the product links to best help achieve the closest outcome. We'll also talk about what went wrong, how it was adjusted in flight, and what settings were used to achieve the results.
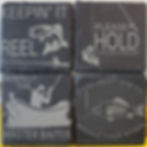
Starting out with the obvious, this was my first ever attempt at slate coasters. A buddy of mine is really into fishing and after seeing some insprational ideas online, I decided to try my hand at making my own. Completely vulnerable here, I'm sharing a picture of my first attempt so bring the critisim, laughs, and most importantly the learning.
What Went Wrong:
Utter laziness (laughing as I type this). That's it. Just eyeballed and mental mathed it. The slates didn't need prep. They engraved great. Everything seated just fine. Just me being lazy.
Fixing it "in flight":
Another deep inhale followed by a sigh. After eyeballing the size and placement across the first 3 coasters, I finally have enough and whip out the trusty ruler. This time (obvously), I nailed it on the last coaster. The alingment was much better and the image size didn't overpower the texture design of the coaster. Completely avoidable situation...
In order of which was engraved first;
Respect the Master Baiter.
It's all about how you wiggle your worm.
Keepin' it reel.
Please hold, I'm on the other line.
Notes:
The 4" coasters I bought measured 3 7/8" inches. This is important to note because a 1/8" offset can lead to truncating a letter or engraving on the ridges. On the "Keepin' It Reel" coaster, we can see how the "K" and the "R" barely made it and were engraved on the ridge.
So 3 7/8" is the outermost part of the coaster (the edge). Then you have what I call "the ridges", which I also want to avoid so all of the engraving can done on the flat top. This reduced my flattop surface to ~3 5/8.
Finally, i wanted to pretty much "guarantee" that 99+% of the engraving happens flattop, so I reduced my flattop surface space to ~3.25". I found that sacrificing that space was well worth the cleanliness and placement of the design, while also allowing the ridge zone to remain clean but also complementive to the design. Kind of like business cards.
The last slate, "Please Hold, I'm on the other line", shows the fish on the bottom left respecting that 3.25" flattop space on both left and bottom. The red line is the coaster itself, blue line is where most of the ridge zone ends, and green line is the safety line or "flattop" engravable area.

Materials List:
Graphic Design Files
Looking for a different design? Search thousands of free laser cut templates here!
DIY Instructions:
Download the Fishing artwork bundle.
Process Job - Settings for xTool D1 Pro 20W.
Material: Stone Coaster
Engrave: Power(%) 40 | Speed(mm/s) 140 | Pass: 1
Score: Power(%) 100 | Speed(mm/s) 80 | Pass 1
Tips:
For designs where the intent is to truncate part of it (overextend past the red line), the laser will frame a wider area than the coaster itself. This is expected, as the laser doesn't know what you want to truncate. There are two ways to approach this; frame based off a corner that will not be truncated and run the job or truncate the design to size then submitting for process.
My Air Assist was turned off.
Conclusion:
I had a lot of fun learning through my mistakes and look forward to creating the next batch. Despite my reservations on the outcome, my buddy loves how they came out and can't wait to use them. My experience with these coasters were great and very simple to use. No pre-prep was needed for the results shown in the picture. The free laser design files are available below, and have been reduced in size to fit within the green lines for the next set I make.